|
Desert Fox is one of those 'difficult to categorise'
games involving arcade and strategy elements. The game
puts you into the heat of World War Two's desert campaign
and pits your wits against that most notorious of opponents,
Rommel. There are several campaigns selectable from
the main menu, but each of these has several constituent
parts which may be individually played out in practice
sessions, again selectable from the main menu.
Before
you get that involved however, there is the option to
modify the sound effects used throughout the game. Basically,
a joystick is used to toggle envelope settings. After
these have been altered to the player's satisfaction,
it's best to proceed directly to the first of the practice
sequences.

Stuka!
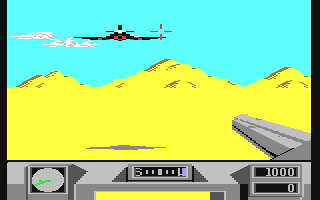
Stuka! Lone Wolf's gunner desparately
tries to line up his cross hairs before the plane
can strafe the tank.
The
first of these is an attack on Lone Wolf (the code name
for your tank -- a fictitious Turbo Sherman) by enemy
Stuka dive-bombers. The player is given the tank commander's
point of view, as enemy bombers zoom in from the horizon.
Guided by a radar display in the bottom left hand corner
of the screen and a joystick movable sight, the Stukas
have to be eliminated by Lone Wolf's slow firing but
powerful gun before too much damage is inflicted by
the Luftwaffe. For all the scenarios, damage is shown
in a gauge at the bottom of the commander's display.

There
is also a tank duel section where an enemy tank (apparently
with firepower similar to Lone Wolf's) skirts across
the limits of your field of vision, loosing off shots
as it goes. Only one direct hit is needed to knock out
a tank but apart from the difficulties of finding its
range, it seems to be highly manoeuvrable and avoids
many shots as a consequence. It does get nearer as the
fight progresses but it also tends to achieve more hits,
so a balance has to be struck somewhere.

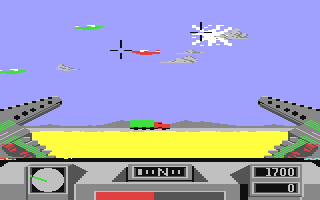
Lone
Wolf's twin machine guns are the only thing
that stands between the enemy aircraft and their
potential convoy target.
One
of the trickier sections to master is the Convoy scenario.
This has Lone Wolf protecting an allied Convoy under
attack from enemy fighter-bombers. The screen shows
a continuous line of moving vehicles in the middle distance
and an absolute traffic jam of fighter bombers letting
loose their rain of hell. This time Lone Wolf has two
heavy machine guns pointing at the enemy. There are
also two sights. Which of the two sights is in operation
depends on whether the joystick is toggled left or right.
Simultaneous operation of the two weapons is impossible.
As usual, the score for this section is displayed in
a window in the right hand part of the 'dashboard' --
for want of better terminology. This section becomes
horrendously complex because as well as the enemy aircraft
(shown in red) there are defending (green) Spitfires,
which must not he shot down (unless you enjoy throwing
away points).

[This screenshot was not part of the original review]
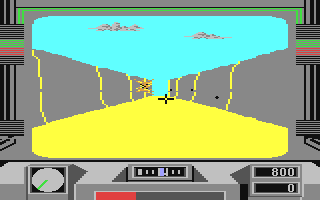
An
ambush scenario included in the game is vaguely reminiscent
of the Star Wars Death Star Trench sequence as
Lone Wolf travels through a canyon, trying to destroy
the mortar emplacements attacking him from both sides.
There is little else to this sequence but it is one
of the fastest moving parts of the game.

[This screenshot was not part of the original review]
Finally
there is a minefield to successfully navigate. Mines
are just visible and can be destroyed by gunfire, however
any that go under the tracks will inevitably do damage
to the tank and slow it down by covering the tracks
in sand. A blue line appears in the compass window,
indicating the course to be followed. The time taken
to complete this section also has a direct bearing on
the score achieved.
After
competence has been gained in each of these sections,
you are ready to move up to the campaigns. There are
five of these, each harder than the last. To win, it
is necessary to relieve any supply depots threatened
by Rommel's forces. If a prohibitive amount of damage
is done to the 'Super Tank' or if any one of the depots
falls to the enemy, the campaign is lost.

[This screenshot was not part of the original review]
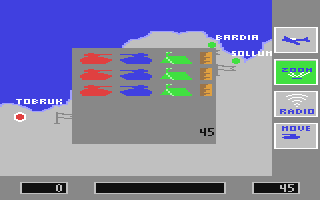
At
the start of the campaign, a map of North Africa is
displayed with several icons and characters on it. A
little tank reveals your current position and a swastika,
that of Rommel. Grey flags show where the depots are.
These turn to blue if the depot has been saved or red
if they are lost. To the right of the screen are several
icons labelled Move, Airstrike, Radio, and Zoom. Zoom
is used to find the status of the depots. If that icon
has been selected and the cursor is located over one
of the flags, a picture zooms into the centre of the
screen to show the number of enemy and allied tanks
at the depots and an indication of how many hours it
has left before falling to the enemy. Once a depot has
been selected to be saved, on the basis of that information,
the Radio icon displays a beacon coming from Lone Wolf.
The joystick is used to point this in the desired direction
and allows the interception of enemy messages indicating
the amount and type of opposition likely to be encountered
on a given course. Clever use of this feature is used
to avoid unnecessary encounters and action. As all the
campaigns last at least 24 hours, there are dawn, day,
dusk and night sequences. Combat should really be avoided
at night and dusk. Incidentally, if there is nothing
but static on the radio, it means no opposition will
be encountered.
Selecting
the Move icon moves Lone Wolf a certain number of units
in the direction the Radio beacon was last pointing.
Rommel is out to stop you from succeeding in your mission
and as a result careful consideration must be given
to which route is to be taken. If it begins to seem
unlikely that a depot may be reached before it falls
to the enemy, then an Airstrike may be called in to
buy time. There may only be one Airstrike in the game
however, so it's advisable to pick your time with care.
If
(or when?) Rommel is finally encountered it's better
to have suffered very little damage, as eight direct
hits are required to make him surrender. If the Desert
Fox does surrender, 8000 bonus points are awarded and
one depot is saved. Also, saving a convoy buys a depot
more time and reduces the player's damage when he reaches
it.
|